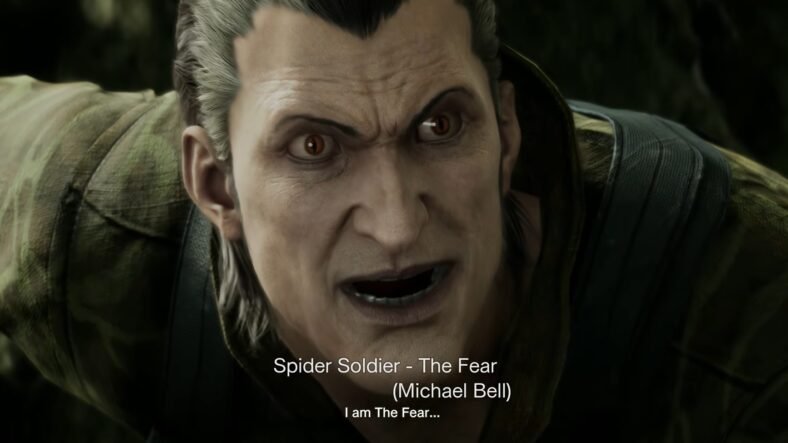
The Fear is an annoying boss battle, partly because he remains invisible and also because he can jump from one tree to another, causing you to move your aim around to get a shot continuously. Just like all other boss battles, The Fear can be taken down lethally as well as non-lethally. Our Metal Gear Solid Delta The Fear Boss Battle Guide details everything that you need to know about taking down The Fear easily.
The Fear Boss Battle Guide – Metal Gear Solid Delta
The Fear comes with many surprises up its sleeve for the boss battle. Thermal Goggles are a must-have item for this battle because the boss is invisible. He has a powerful crossbow, which he does not hesitate to use against you. He has multiple crossbow attacks, like the regular bolt attack and the explosive bolt attack. While the grenade bolt is relatively straightforward, he shoots a bolt that lands at your feet and releases a grenade; the normal bolt attack can also come in three different variants.
It can be a single bolt, a volley of bolts, or a fast barrage of bolts. You can dodge away from the grenade easily, but the regular bolt attacks will need good dodge timing. When you manage to land a hit on him, he will always yell ‘The Fear’, giving you a signal that your hit has landed perfectly. To make matters worse, the arena is filled with traps as well. The volley attack continues for a fair amount of time, so your best bet is to run around, but also try to avoid the hidden traps here and there.
There are two types of traps in the arena. You have Rope traps, and you have pressure plate traps. The rope traps are found in trees and walls, and when you get close to them, and the rope is broken, it will trigger an explosion. The pressure plate traps need to be stepped on to trigger them. If you get close to a trap and it has not triggered for some reason, The Fear will start shooting at it to trigger the trap, so make sure that even if you managed to miss a trap, there is still the chance of the boss shooting it and triggering it.
As you continue to damage the boss, you will notice a visible change in his movement pattern. It depends on the type of takedown you are going for. If you are shooting him with regular weapons, the boss will move around faster and become more aggressive towards you with repeated attacks. Every time he lands on a tree, he will attack with powerful attacks.
If you are going for the non-lethal takedown, the boss will slow down and start looking around for food. Instead of focusing his attacks on you, he will look around for food, try to land closer to it, and shoot it to eat it. He will try his best to regain his stamina. There is another problem with him, of changing his jumping pattern when his health reaches a certain limit. Once his health trickles down enough, he will start jumping four times in a row and then land on a tree branch to attack.
Lethal Takedown
The lethal takedown for The Fear is fairly straightforward. You can use any weapon to damage him, and if you lose track of the boss, you can use Thermal Goggles to see him. Remember, with each hit, his speed and aggressiveness increase, so try to end him quickly with headshots and powerful attacks. You can also try to use his own traps against him.
Non-Lethal Takedown
Taking down The Fear non-lethally is no easy feat because of his changing movement tactics. You can use the Mk22 for a non-lethal takedown, but you must keep in mind that as his stamina drops, he will try to replenish it by finding food in the arena and eating it. Instead of shooting you, he will start shooting down fruits from trees and then eating them to restore his stamina. It becomes a timed battle between you trying to get his stamina to zero and him trying to replenish his stamina back to full.
Try to land headshots, and you can use Thermal Goggles to see him if he stays stationary for too long. Once his health drops below 50%, he is always cloaked. In addition, if you run out of ammo for your Mk22, there is some sitting close to the point where the boss spawned at the start. There is another trick that, once his speed is slowed down, shoot him mid-jump, and it will reset his animation, causing him to jump again twice. You can repeat this strategy until his health is gone and he is taken down.
That is all for this guide. Additional Metal Gear Solid Delta guides are linked below:
- Metal Gear Solid Delta: Snake Eater Weapons Guide – All Weapons, How to Obtain
- Metal Gear Solid Delta: Snake Eater Camouflage Locations Guide – All Uniforms, Face Paints
- Metal Gear Solid Delta: Snake Eater Food Locations Guide – All Food Items, Where to Find
- Metal Gear Solid Delta: Snake Eater Healing Radio Stations Guide – All Radio Stations, Tuning Frequencies
- Metal Gear Solid Delta: Snake Eater Boss Battles Guide – All Bosses, Lethal & Non-Lethal
- Metal Gear Solid Delta: Snake Eater Ocelot Boss Battle Guide – Lethal and Non-Lethal
- Metal Gear Solid Delta: Snake Eater The Pain Boss Battle Guide – Lethal and Non-Lethal
- Metal Gear Solid Delta: Snake Eater The Fear Boss Battle Guide – Lethal and Non-Lethal
- Metal Gear Solid Delta: Snake Eater Boss Battles Guide – All Bosses, Lethal & Non-Lethal
This concludes our Metal Gear Solid Delta The Fear Boss Battle Guide. If you want to add anything to this guide, feel free to use the comments section below.