Similar to the original title, Final Fantasy 7 Remake brings with it tons of different challenging bosses that you will encounter at key points throughout Midgard. It is vital that you know the weaknesses of all these bosses so that you can easily defeat all of them easily prior to challenging them otherwise you are in for a tough fight. Lucky for you, we have curated Final Fantasy 7 Remake Boss Battles Guide in which we have detailed how you can defeat all of the bosses in Final Fantasy 7 Remake easily.
Boss Battles Guide – Final Fantasy 7 Remake
Our Final Fantasy 7 Remake Boss Battles Guide details everything that you need to know about boss battles in Final Fantasy 7 Remake.
Miniboss #1 – Huntsman
Huntsman starts as a miniboss and you will fight quite a lot of them as the game progresses. They appear for the first time after certain story progression so you will have plenty of tricks up your sleeve until that time. They come equipped with a riot shield making direct attacks futile. Magic works best again them to remove their riot shield and expose them so that you can move in and attack them to finally defeat them. When they are exposed, your best chance at dealing damage is to go to their back and continue hitting them until you have filled your ATB meter.
These attacks to do not actually kill them so that you need to do when you’re all up on ATB is to get back on the front and land a Fire Spell in his face to make his drop his shield. This will allow you to freely chop away at his health while building up your ATB meter once more. If you do manage to build it right in time, you can land a Focused Thrust which will really put a dent in its health meter. Keep at it and it will go down fairly quickly. Use the same tactic every time you come face to face with another Huntsman later.
Boss #1 – Scorpion Sentinel
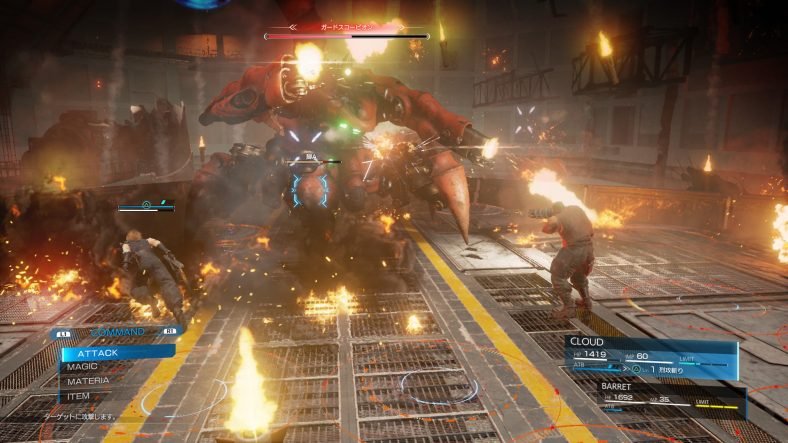
You will encounter the Scorpion Sentinel boss at the end of Mako Reactor 1. This boss battle has 4 phases so you are in for a long and hectic fight. During the first phase of the battle, your best means of damaging the boss is Barret’s Thunder Spell and Cloud’s physical attack combos. Use them plenty during this phase. The boss will attack you with gunfire, missile salvos and tail swipes so avoid getting too close to the boss. Upon the boss staggering, quickly use Cloud’s Braver and Barrett’s Focused Shot abilities to deal some massive damage.
After the health has dropped around 75%, you will enter the second phase of the battle as the boss will jump back and get a good distance between you and itself. It will start attacking you with missiles so your best bet is to get in close as quickly as possible and get near to the boss in order to deal damage to it. For this phase, you will first need to lower the shield around the boss before you can actually land some damage on it. Switch to Barret and try to get behind the boss.
Once at the back, you will see that there is a generator under the tail of the boss. Your next target is this generator. The boss does not let attacks go down that easily at the weak point however during this stage, Barret’s Steelskin ability is your best friend because it reduces the incoming damage and does not allow him to get staggered. Destroy the generator and the battle will return back to phase 1. Use Cloud’s physical attack and Barret’s Thunder spell to reduce the health down to 50%.
Once the boss’s health has trickled down to 50%, it will change tactics once more and you will enter the third phase of the battle. During this phase, the boss will start using the laser gun in its tail to attack you however you can dodge this attack easily as you roll around as Cloud. Get too close to the boss and it will electrify the ground around itself so you should watch out for that as well. During this phase, you can hide behind the fallen debris to hide from the laser tail attack as well. Use the window between the tail attacks to deal some damage and then quickly retreat back before the boss electrifies the ground. Reduce the health down to 2% to enter the final phase of the battle.
Once reduced down to 20%, the boss will enter its final battle stage and it will play its final cards against you including an extremely powerful attack that combines both cannon and missiles at the same time. Watch out as the boss will also try to regenerate its health during this phase so you cannot delay attacking the boss too much. During this phase, your best bet is to bring out everything you’ve got and simply pulverize the boss with it. Use Cloud’s Punisher mode and any Limit Break that you might have at this point to close the deal with the boss once and for all. The boss will eventually go down.
Boss #2 – Rude
You will encounter this boss in Sector 5 Slums. This is a 2 phase boss fight however it is still a tough boss fight if you are not careful during the fight. Rude prefers melee attacks and does not spend too much time away from you. Every time you try to get away from Rude, he will quickly get in close and land his deadly attacks on you. Since you have Aerith in this fight as well, her support abilities play a major role in this fight and will determine whether you will the boss fight or not.
As soon as the battle begins, let Rude attack you a few times and learn his attack patterns. Block and dodge his attacks but remain on the defensive until you have a good knowledge of this attack pattern. You will need to switch between Operator and Punisher states during the boss fights quite a lot so learn the exact points when you should switch between the two. Counterattacks are your friend during this fight so every time you have to go on the offensive, you must be in Punisher stance. Otherwise, stay in the Operator stance for increased mobility for easy dodging.
These counterattacks will quickly fill Rude’s Stagger meter and once it is full, he will enter the staggered state giving you a clear window and getting in and dealing some major damage. Until this happens, you should avoid staying in the open and without defense or Rude will make short work of you. Keep nabbing at his health with counterattacks and once he is staggered, go in for the big blows. Make sure to guard his Spinning Axe Kick instead of dodging it because you will always get hit if you try to dodge his Spinning Axe Kick.
Your counterattack windows are during his normal punch and kick attacks. Dodge or block his major attacks and when he switches to normal punch and kick attacks, counter his attack and stagger him for your chance at swiping at his health meter. Always land a few hits and back down because if you try to push too much, Rude will recover and he will beat you up good if you are not prepared. During this phase, you must only switch to Aerith when you have to use a healing spell. Otherwise, stick to using Cloud because Aerith is not good when it comes to dealing damage.
Keep this up and soon Rude’s health will drop down to 50% triggering the second phase of the fight. During this phase, Rude will include a few more special attacks in his combo list however the overall strategy of the battle remains pretty much the same. Avoid his Shockwave attack at all times because it will launch you in the air and leave you vulnerable for more attacks following the main attack. Most of Rude’s attacks are built this way that leads to you being staggered and Rude profiting on it.
Other attacks including Spirit Geyser and Seize are also pretty deadly. You can avoid Spirit Geyser by dodging since it spawns right beneath you while Seize can be avoided by landing short combos because Rude will suddenly grab you, give you a good beating and then throw you at Aerith dealing solid damage to both. Keep attacking Rude during the windows and you will eventually beat him. Remember to use Aerith to keep Cloud’s health up otherwise Cloud will not survive for long against Rude’s punches in his face. Using a Limit Break in the second phase is also extremely useful.
Boss #3 – Enigmatic Spirit
Probably the weirdest boss in Final Fantasy 7 Remake, the Enigmatic Spirit not only looks weird but is also a little different to kill than all other bosses in the game. Enigmatic Spirit comes with mysterious spirits around itself which act as some sort of guardian shield because to deal a good amount of damage to the boss itself, you will need to first destroy these spirits that accompany the boss.
Right as the battle starts, forget the main boss and focus all your attacks on the spirits accompanying the boss. Take them out and this will allow you to land proper attacks on the boss which will allow you to stagger the boss. Once the boss is vulnerable to your attacks, use every attack and spell in your command to deal damage to it to build up its stagger meter. Make sure you deal with the spirts first and once the boss is weak, you only focus on it then. Do not get too close to the boss as well until you can really deal damage to it. This is a fairly simple fight.
Boss #4 – Roche
Roche is another one of the bosses that you will fight in Final Fantasy 7 Remake and beat him. Roche is one of the bosses which were not present in the original Final Fantasy 7 so even if you have played the original game, you will not know much about this brand new boss featured in Resident Evil 7 Remake. Roche has two different boss encounters and during both fights, you will need to adopt a different strategy.
The first encounter is actually pretty annoying even for today’s standards. The first encounter takes place on a bike and you have to catch up to Roche in order to attach him. Of course, Roche will not make that easy for you since he will continue to attack you during this time. Every time you get close, Roche will start attacking you and you will need to dodge the attacks while accelerating to remain close to him. When you are close enough, you can attack Roche by pressing L1 and Triangle. This is a special attack so you will only be able to attack as long as your bar allows it.
Avoid Roche’s charged attack because if normal attacks don’t deal much damage, the charged attack will deal quite a lot of damage to you. There is not much else that you can do in this phase. Just avoid his attacks, continue to close in and land some blows on Roche. Keep doing this for some time and he will give up eventually. This concludes your first encounter with Roche.
After this fight, you will come against Roche once again and this time, the fight will be a lot tougher than the first encounter. This fight has two phases with the first phase rather an easier one. During the first phase, Roche will not use too many charged attacks so you can counter his attacks and land some of your own blows on him to build up his stagger meter. Deplete around 50% of this health and you will trigger the second phase of the battle where things get a little tough. During this phase, you will need to avoid Roche’s plenty of charged attacks and if you are not careful with dodging or are getting to close to the boss, he will charge right through you.
The trick to getting past this phase is patience. Which means that you go in, land a few hits in the good window and then retreat. If you try to be greedy with your attacks and do not watch out for incoming retaliatory attacks, you will be served some good ol’ punches and kick right across your phase. The charged attacks will blow right through your block as well so they are not worth tackling. Just move in, land a few hits when you can and get back and maintain your distance until you can find another good window. Keep doing this and Roche will eventually die.
Boss #5 – Air Buster
Air Buster is a lengthy boss fight and you will need the help of Barret, Tifa and Cloud combined in this battle to survive it easily. Before starting the boss fight, make sure that you have Elemental Materia equipped on at least one character. If you have three of them, you can equip it on all of the characters but if you only have one, pick Tifa. Your main attacks for this boss fight will be Airbuster, Thunder, Rise and Fall, Braver and Focuses Shot. The last three will be used in a combo when the boss is staggered.
Air Buster has plenty of ranged attacks so you will need to be extremely agile on your feet until unless you are ready to attack him. If you get hit with Airbuster’s primary attacks, they can kill you easily or deal an immense amount of damage making it a dangerous boss to tackle without preparations. Every time you see an attack approaching, just move to a safe location quickly and you should be good to go. Air Buster will focus on the character under your control so it is also good if you continue to switch around the characters as much as you can to deal damage to the boss easily and keep it confused as well.
During certain times, Airbuster will also rise up from the platform and attack from the air. When this happens, simply switch to Barret and Tifa and Cloud can continue to attack it with Thunder spells ensuring that the boss is not just sitting there in the air with no damage being done to it. Until you can get the boss staggered, your attacks should be Thunder spells, along with Rise and Fall. Summon Ifrit and use Limit Break attacks as well when you can. Once the boss is staggered, land a combo of Rise and Fall along with Braver and Focused Shot and the boss will suffer heavy damage. Keep this going and the boss will die soon.
Boss #6 – Hell House
Hell House probably has the highest health in the game or it certainly feels like it because it just refuses to die in the game. Along with massive health, Hell House’s attacks deal a significant amount of damage to you as well so it is one of the toughest bosses in Resident Evil 7 Remake. Its high resistance to nearly every status is also an annoying bit. Similar to the Air Buster boss fight, if you have Elemental Materia, it will come super handy in this fight as well.
Try to use magic weapons in this fight because spells are effective against Hell House more than physical attacks. As you begin fighting Hell House, a time will come when Hell House will create a barrier around itself with an element and will become completely immune to it. When this happens, pick the element opposite to the one Hell House is using as his barrier and start attacking the barrier. This will allow you to punch a hole in the barrier and deal damage to the boss in order to increase its stutter gauge.
Keep trickling down its health and eventually, you will trigger the second half of the boss fight. During the second phase, Hell House will turn itself into some sort of a super house that will massively increase its resistance to all sorts of attacks and elements. However, on the plus side, as soon as this is over, the boss is extremely vulnerable for being staggered for a very short window. Use this window to hit it with a Focused Thrust to increase the Stagger meter. Aerith can also join in with some spells to damage the boss.
You can continue this strategy and continue to trickle down its health and fill its stagger meter. During the final phase of the battle, you can use your summon and you will be all set for the final push. This is probably the longest and the lengthiest boss battle in the game and it will greatly test your patience. As long as you do not lose your patience and keep following our strategy, you will be good to go and you will soon defeat the boss.
Optional Boss Fight – The Annoying Attack Dog (On the Prowl Side Quest)
This is one fight in the game that really annoyed me. Not because it is tough but simply how annoying this attack dog fight is. For a dog, the Attack Dog hits hard and in return, you can hit it hard as well. You will fight this dog dueling the side quest On the Prowl. This is a completely optional fight and you can even not consider it a boss as well. But since it annoyed me too much, I thought I would just include it here in this guide and save you some trouble.
The Attack Dog hits ferociously which means that it is more agile than and it is also faster than you. You cannot expect to treat it like a dog and continue to attack it with your weapons relentlessly. The dog will happily return the favor and it will return it hard. Your most effective weapon here is Guard. Yes, you will need to be on your best guard behavior for this fight. Keep blocking the dog’s attacks and only attack when you really see a window. The dog will quickly bite away all of your health if you do not block much in this fight.
You will have Cloud and Tifa during this fight so you can stack Tifa’s Chi up really high with the Unbridled Strength. When the dog is staggered, unleash the Chi upon it for some massive damage. Afterwards, quickly switch to Cloud and use Cloud’s Braver and Divekick abilities to land a deadly combo on the dog. The dog will eventually run but you will follow it and during the next boss fight phase, use the same tactics and strategy and you will beat it eventually.
This is all for our Final Fantasy 7 Remake Boss Battles Guide. If you need more help with the game, you can check out the guides below.
This concludes our Final Fantasy 7 Remake Boss Battles Guide. If you want to add anything to this guide, feel free to use the comments section below.